


RTK
Redux Toolkit streamlines Redux state management in React by minimizing setup overhead with createSlice, simplifying actions and reducers. It integrates thunks for async operations and DevTools for debugging, while promoting immutable updates. This improves development efficiency and maintainability in Redux-based applications.
The jargons
There are few keyword that you need to know about before starting this project.
store: It keep the track of all state. It can be called as global store .
reducer: They are almost like a controller. Their job is to just update, add, remove the things (where logic are written). It is just an object with key value pair & each key is almost like action.
useSelector: It is an additional hook used so that they can selectively ask the store that i need information. With the help of useSelector we can gather info from the store.
useDispatch: It is a hook used whenever we need to update information to the store. It is used along with the reducer.
Practical Implementation with Project Todo web app.
A "To-Do app" organizes tasks, tracks progress, and manages activities, aiding productivity and time management for users' daily responsibilities.
Technology and Packages used
React: React is an open-source JavaScript library for building reusable, efficient UI components that update dynamically, enhancing web application interactivity.
redux toolkit : Redux Toolkit streamlines Redux state management in React by minimizing setup overhead with
createSlice, simplifying actions and reducers.react-redux: The purpose of React-Redux is to seamlessly integrate the React UI library with the Redux state management library, facilitating controlled state updates and predictable rendering in React applications.
File And Folder Structure.
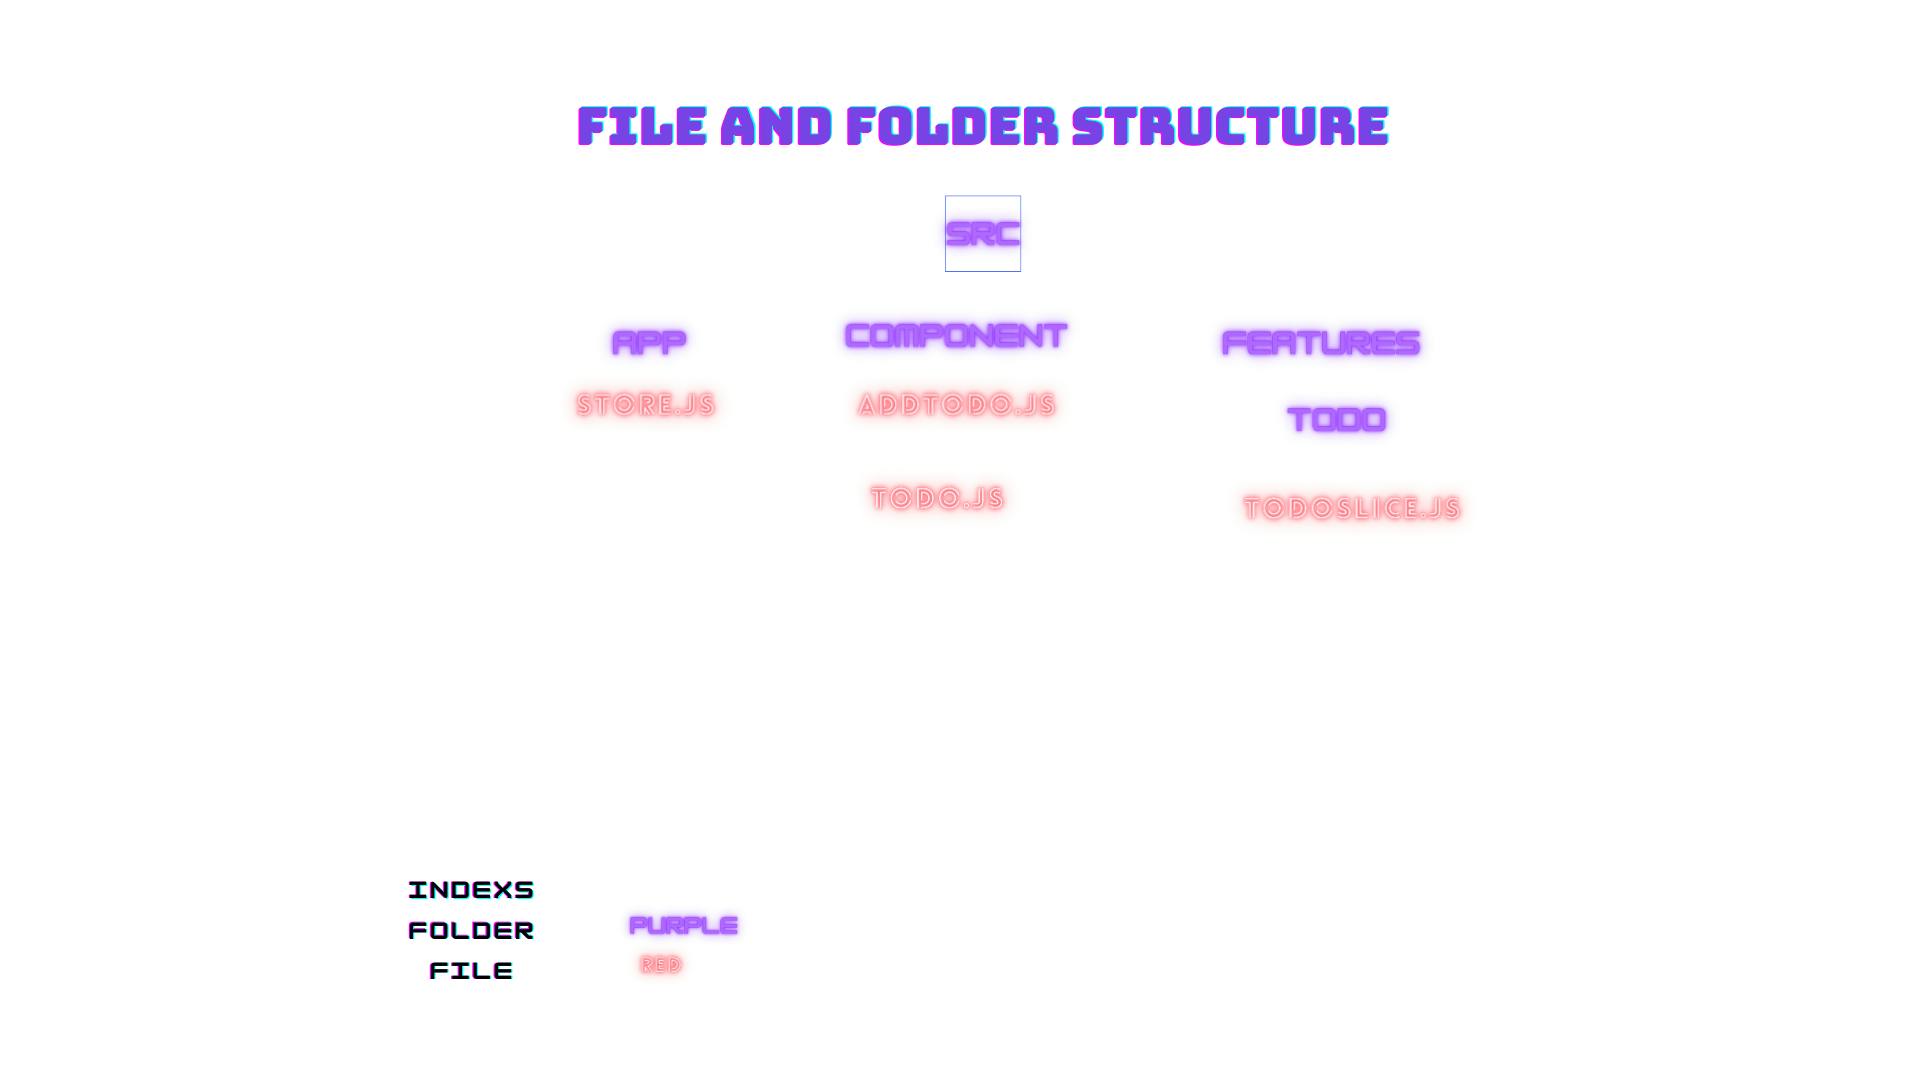
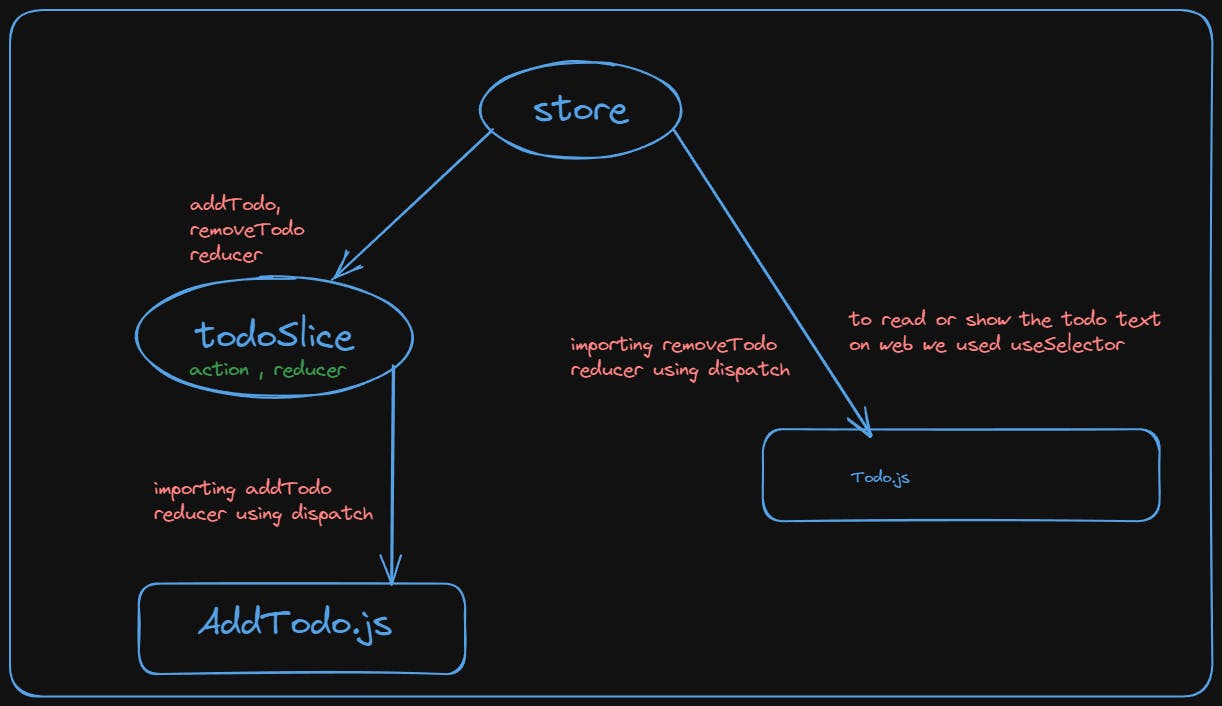
Mindmaping of the Project
Steps:
- Create a file store.js inside app folder inside src.
import { configureStore } from "@reduxjs/toolkit";

export const store = configureStore ({
    reducer:{}
})
This code sets up a Redux store named store using Redux Toolkit's configureStore function with an empty reducer, essentially creating an initial Redux store with no specific state management.
- Create a folder features inside it create a folder todo and inside it create a file todoSlice.js
// Import necessary functions from Redux Toolkit
import { createSlice, nanoid } from "@reduxjs/toolkit";

// Define the initial state for the slice (state.todos is an empty array)
const initialState = {
    todos: [],
}

// Create a Redux slice using createSlice
export const todoSlice = createSlice({
    name: 'todo', // The name of the slice, used for reference in Redux DevTools
    initialState, // The initial state defined above
    reducers: {
        // Reducer for adding a new todo
        addTodo: (state, action) => {
            const todo = {
                id: nanoid(), // Generate a unique ID using nanoid
                text: action.payload, // Get the todo text from action payload
            };
            state.todos.push(todo); // Add the new todo to the todos array
        },
        // Reducer for removing a todo
        removeTodo: (state, action) => {
            // Filter out the todo with the specified ID
            state.todos = state.todos.filter((todo) =>
                todo.id !== action.payload
            );
        },
    },
});

// Export the action creators generated by createSlice
export const { addTodo, removeTodo } = todoSlice.actions;

// Export the reducer function generated by createSlice
export default todoSlice.reducer;
Notes:
All the reducers should exported with the help of actions.
we can call todoSlice.reducer with any name while importing.
This code defines a Redux slice for managing a list of todos, allowing you to add and remove todos. It exports action creators and a reducer function for this slice.
- Now again moving to store.js
import { configureStore } from "@reduxjs/toolkit";
import todoReducer from "../features/todo/todoSlice"
export const store = configureStore ({
    reducer: todoReducer   // added or changes
})
As we said we can call todoSlice.reducer with any name so we called todoReducer.
- Create a component folder inside src and inside create a file name AddTodo.js
import React, { useState } from 'react';
import { useDispatch } from 'react-redux';
import { addTodo } from '../features/todo/todoSlice';

const AddTodo = () => {
    const [input, setInput] = useState(''); // State to manage the input field value
    const dispatch = useDispatch(); // Redux dispatch function

    const addTodoHandler = (e) => {
        e.preventDefault(); // Prevent default form submission behavior
        dispatch(addTodo(input)); // Dispatch the addTodo action with the input value
        setInput(''); // Clear the input field after submission
    };

    return (
        <form onSubmit={addTodoHandler}>
            <div className="mb-4">
                <label htmlFor="input" className="block text-sm font-medium text-gray-700">Input Field</label>
                <input
                    type="text"
                    id="input"
                    name="input"
                    className="mt-1 p-2 w-full border rounded-md focus:ring focus:ring-indigo-300"
                    value={input}
                    onChange={(e) => setInput(e.target.value)} // Update the input state as the user types
                />
            </div>
            <button
                type="submit"
                className="w-full bg-indigo-500 text-white p-2 rounded-md hover:bg-indigo-600 focus:outline-none focus:ring focus:ring-indigo-300"
            >
                Submit
            </button>
        </form>
    );
};

export default AddTodo;
useState: Manage input state.useDispatch: Redux dispatch function for actions.addTodoHandler: Handle form submission and dispatch action.preventDefault: Stop default form submission behavior.label htmlFor: Associate label with input for accessibility.onChange: Update input value as user types.value={input}: Bind input value to the state.dispatch(addTodo(input)): Dispatch Redux action with input value.setInput(''): Clear input field after submission.className: Apply Tailwind CSS classes for styling.
- Go to index.js file
Now wrap <App/> with provider by importing provider and the store.
import { Provider } from "react-redux";
import React from "react";
import ReactDOM from "react-dom/client";
import "./index.css";
import App from "./App";

const root = ReactDOM.createRoot(document.getElementById("root"));
root.render(
  <React.StrictMode>
    <Provider store={store}>
      <App />
    </Provider>
  </React.StrictMode>
);
- After this go to the inspect and open redux dev tool if you havent installed the extension than do it asap.

You will see that result.
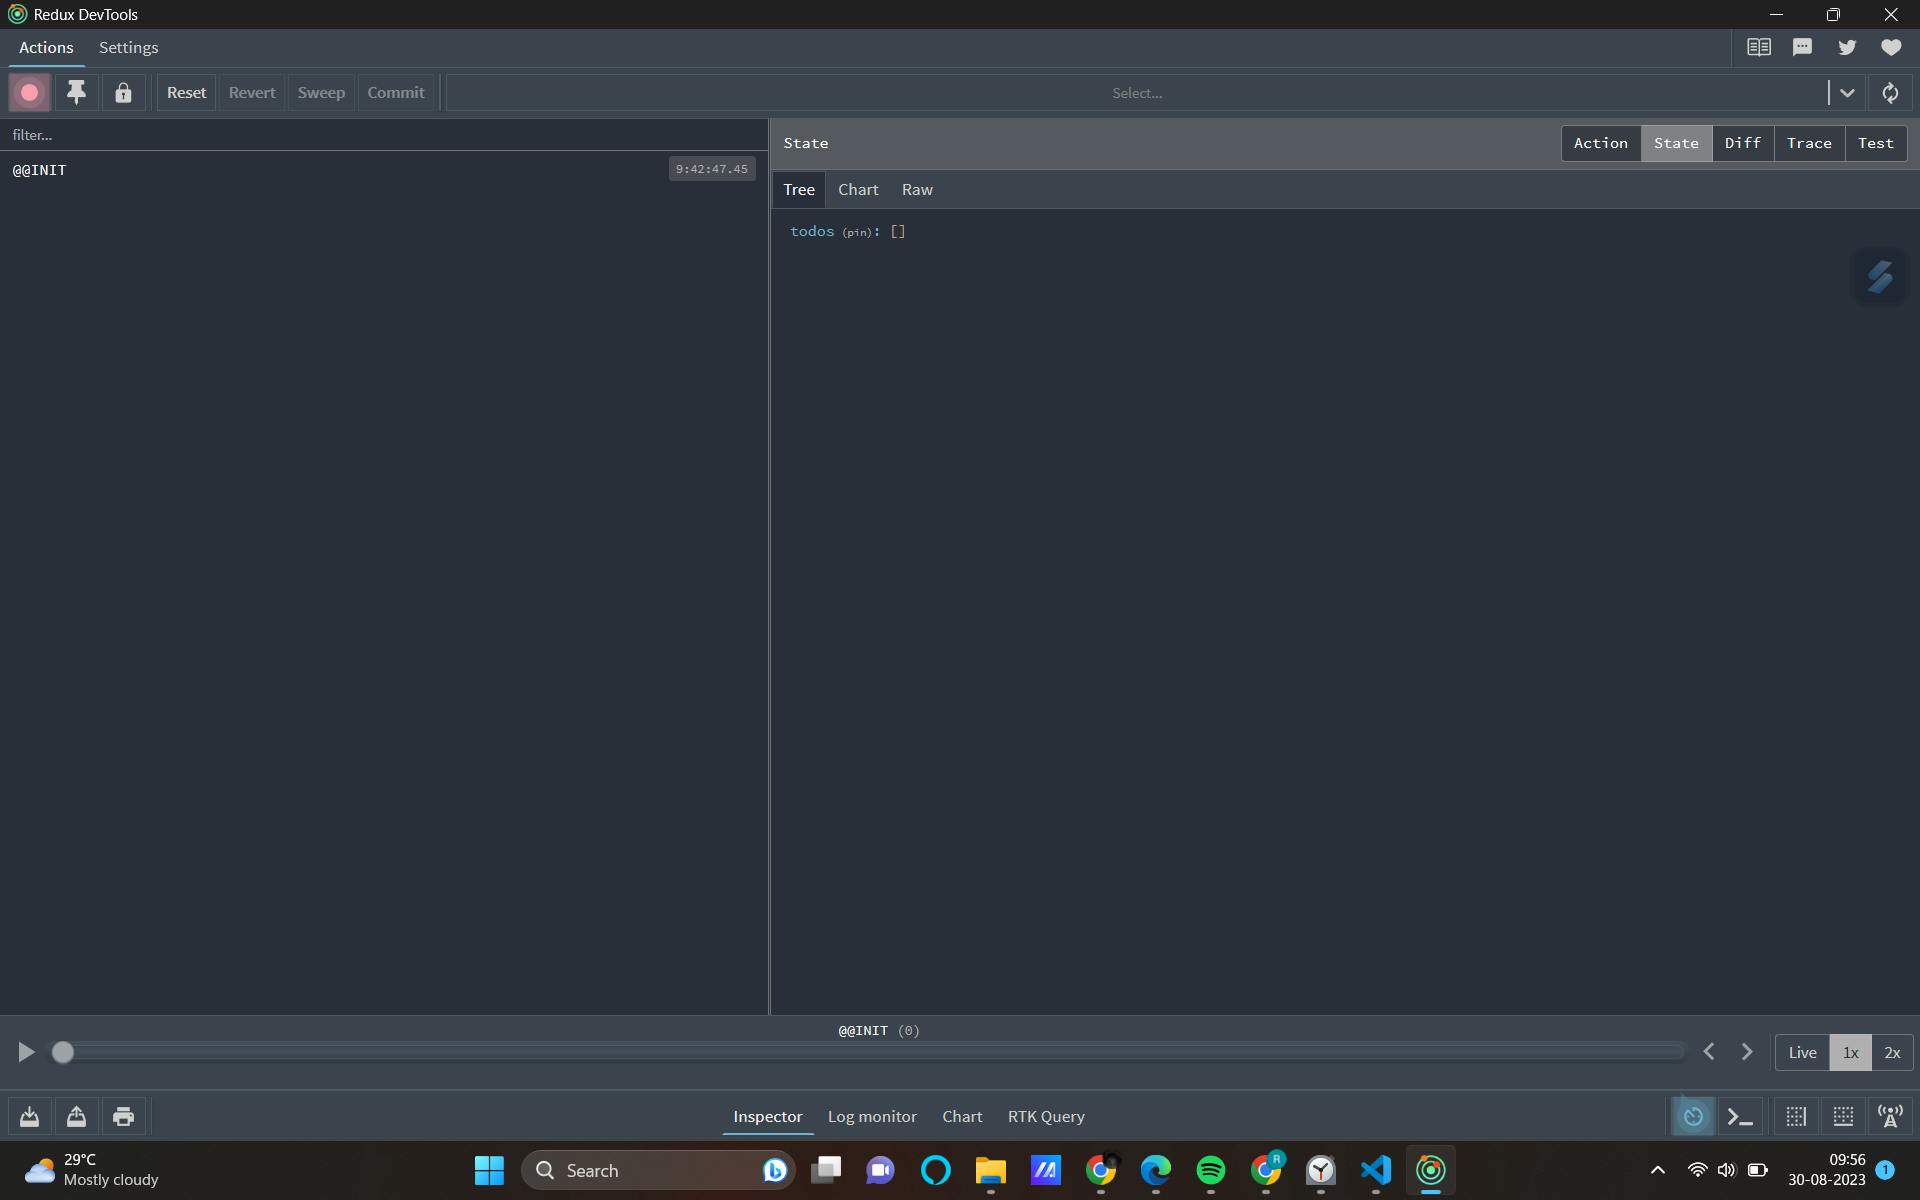
You can check what you like to eg state ,diff ,trace ,test
- Go to Todo.js
Here we use useSelector for reading.
**useSelector:**With the help of use Selector we can gather information from the store.
useDispatch: Therefore it is used with removeTodo reducer to delete todo.
import React from 'react'
import { useSelector } from 'react-redux'
import { useDispatch } from 'react-redux'
import {removeTodo} from '../features/todo/todoSlice'
const Todos = () => {
  const todos = useSelector(state => state.todos) //reading or loading data
  console.log(todos)  // ref empty array from the slice.
  const dispatch= useDispatch()
  return (
    <>
      <div>Todos</div>
      {todos.map((todo) => (
        <ul className='list-none  '>
          <li className='list-none bg-black w-[100vw] flex gap-[300px]'>
              <div className='   text-white' key={todo.id}>{todo.text}</div>
              <button onClick={()=> dispatch(removeTodo(todo.id))} className='text-white bg-red-500 rounded-lg'>X</button>
          </li>

        </ul>
      ) )}
    </>

  )
}

export default Todos
- Go to app.js
Now import the component AddTodo.js and Todos.js
import './App.css';
import AddTodo from './components/AddTodo';
import Todos from './components/Todos';

function App() {
  return (
    <div className="App">
      <AddTodo/>            //added
        <Todos/>            //added
    </div>
  );
}

export default App;
Now finally our web app of todo is done and works well.
Suggestion: Never directly jump into code I have successfully wasted a lot of time by Jiping into code directly. So first read jargon understand its need and then utilize it in the program.